.png)
EHA GHM’s cold chain monitoring technology ensures near real-time visibility across diverse storage and transport conditions. Sensors are placed inside cold rooms, refrigerators, cold boxes, and refrigerated trucks to safeguard essential health commodities.
The EHA GHM web/mobile applications are where you can view your monitoring information and keep your system up to date. Administrator users can also add and edit users and locations among other things.
Step by Step
Note: If you need an account created, please reach out to your company's administrator or contact support@eha-ghm.org if your company does not have an administrator account yet.
Users that have Administrator permissions can create new users to access EHA GHM applications.
Step by Step
Login welcome messages are typically sent when an administrator first creates a user. Follow the instructions below to send users additional messages to log-in.
Step by Step
Administrators can edit user details and permissions.
Step by Step
If the user is logged in, they will need to log out and log back in to see changes.
Response: Learn how to change your account from Fahrenheit to Celcius or vice-versa.
Here is a list of items to prepare for your installation:
Data recorded on Trek Tabs and Pro's can be offloaded via the EHA GHM mobile app, which can be downloaded from the Apple App or Google Play stores.
Step by Step
Note: Users do not need to be logged in to transfer data.
Once a shipment arrives, you can see if there is an alarm or if a temperature excursion happened. Anyone can do this, no log in is required.
Step by Step
Green: no issue recorded.
Yellow: a warning recorded.
Red: an alarm recorded.
Note: For more in-depth data analysis, transfer your data to the EHA GHM platform.
You can view temperature data on the web application if you have EHA GHM login access.
Step by Step
Note 1: You can interact with the timeline graph, download CSV reports, and view further contextual data.
Note 2: This function is not yet available for iOS users.
Uploading data to the cloud is essential so you can view it in the web app. You do not need to login or have an EHA GHM account to upload data.
Step by Step
Note: If you have an EHA GHM Passport, the Passport will automatically transfer device data to the EHA GHM platform. Trek devices must be within the Passport's bluetooth range.
EHA GHM devices communicate to your phone and with each other via Bluetooth Low Energy (BLE). If you have trouble connecting, try the following steps.
Step by Step
Your mobile phone uses Bluetooth to connect to EHA GHM devices. Bluetooth connectivity on your phone does not always connect automatically. Please try these steps to connect.
1) Is Bluetooth on?
Open Settings.
Go to Bluetooth, and turn it on.
Try to connect to the EHA GHM device.
Still not connecting? Continue to the next step.
2) Turn Bluetooth Off and On
Open Settings.
Go to Bluetooth, and turn it off.
Wait a few seconds and then turn Bluetooth back on.
Try to connect to the EHA GHM device.
Still not connecting? Continue to the next step.
3) Restart the EHA-GHM App
Close the EHA GHM App.
Wait a few seconds, then reopen the EHA GHM App.
Try to connect to the EHA GHM device.
Step by Step
4) Turn Phone Off and On
Turn your phone off.
Wait a few seconds and then turn your phone back on.
Open the EHA GHM App.
Try to connect to the EHA GHM device.
If you're still not able to connect, please contact EHA GHM support via email at support@eha-ghm.org
Once a shipment arrives, you can see if there is an alarm or if a temperature excursion happened. Anyone can do this, no log in is required.
Step by Step
Note: For more in-depth data analysis, transfer your data to the EHA GHM platform by scanning the device with the EHA GHM mobile application.
You can view temperature data on the web application or a mobile device if you have EHA GHM login access.
Web App
Note: You can interact with the timeline graph, download CSV and PDF reports, and view further contextual data.
Android App
Note: This function is not yet available for iOS users.
Update Product Profiles on Trek Pro’s using your mobile device.
Step by Step
The Trek LED light will quickly flash green 3 times to indicate the process is complete.
Note #1: If a customized product profile is desired, reach out to your EHA-GHM account manager.
Note #2: This feature is not feasible for Trek Tab devices.
The EHA GHM Trek tab is a single-use wireless data logger that monitors temperature. The Tab is designed for comprehensive visibility throughout a shipment- from the origin to the destination.
Features of the Trek Tab include:
The EHA GHM Trek tab is a single-use wireless data logger that monitors temperature, and can be activated for placement in shipments using these directions.
Checking the Status
If you are unsure if the Trek Tab is activated, quickly press and release the center PUSH button. Do not hold it.
If no LEDs light up, the device is not activated.
If the center LED blinks green, the device is activated.
If the two side LEDs light up, the device has already been used. Don't use it.
Creating a shipment allows you to access data from a Trek device when it is uploaded to the EHA GHM Web Application.
Step by Step
Mandatory fields are Shipment Name, Origin, and Destination.
If a new start or end location needs to be added, please reach out to EHA GHM.
The Trek ID can be found on the back of the device
You can go back and edit any of this information at any time
Note: This feature is not yet available for iOS users. For users operating on iOS systems, please create Shipments on the EHA-GHM Web App.
Note: This functionality requires an EHA GHM account. If you need an account created, please reach out to your company's administrator or contact support@eha-ghm.org if your company does not have an administrator account yet.
Creating a shipment allows you to access data from a Trek device when it is uploaded to the EHA GHM Web Application.
Step by Step
Note: You can go back and edit any of this information at any time.
If you would like to add additional origin and destination points, please reach out to EHA GHM Support at support@eha-ghm.org
Trek Tabs cannot be turned off. You can edit shipment end times in the EHA GHM Web Application.
Keep the Shipments page organized with the "Mark as Reviewed" checkbox and filter.
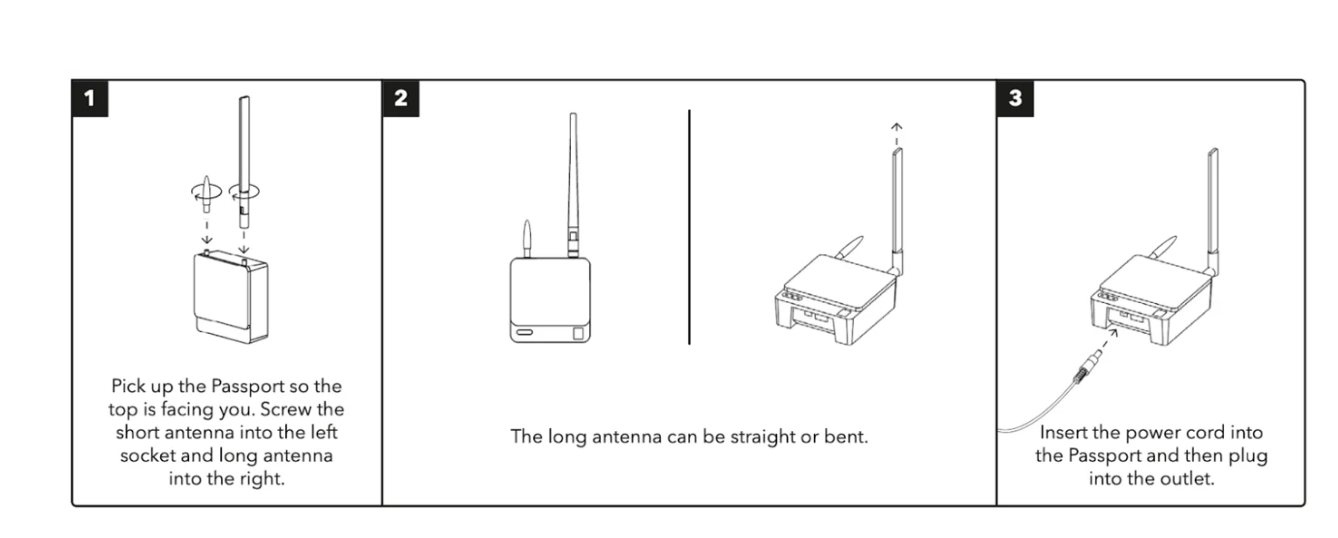
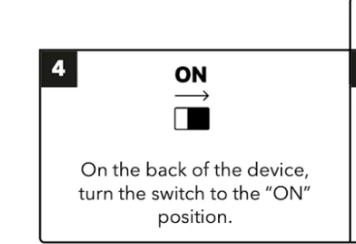
The EHA GHM Passport allows for hands-free and automated data uploads from Trek Devices.
Step 5: Download the EHA GHM mobile app
Step 6: Press the blue button on the side of the Passport
Step 7: Use the EHA GHM app to scan the QR code on the front of the Passport
Note: Steps 1-4 should get your Passport working. Steps 5-7 are for advanced options.
Passport can connect to the internet via cell, WiFi and Ethernet to share data with the EHA GHM Web App.
Step by Step: Cell Connection
The Passport will automatically connect to a cellular network when turned on. A solid white light above the cloud icon in the bottom left-hand corner of the Passport will indicate internet connection, which can take up to 30 minutes. If the Passport fails to connect:
If the Passport still fails to connect, please contact support@eha-ghm.org or consider connecting it to WiFi or Ethernet.
Step by Step: WiFi Connection
Trek Signal Strength is an indicator of how quickly data will be transferred from a Trek to a Passport.
What is Trek Signal Strength?
Treks that are in the medium or strong range will transfer data at the fastest rate. Treks that show a weak range will take longer and/or might not consistently transfer data to a Passport.
Step by Step
Improving Trek signal strength
Moving the Passport can improve Trek signal strength.
The fewer barriers in between the Passport and the Trek(s), the better the signal strength will be. After you move the Passport, you need to retest the signal strength.
Retesting Trek signal strength
Note: The Passport cannot scan for Treks while connected to the mobile phone. To rescan for nearby Treks after adjusting their positioning, close the app, wait 3 minutes, and then reconnect to the Passport.
EHA-GHM Administrators can set up notifications for any user to be alerted when a particular Asset’s temperature is outside of the desired range.
Step by Step
EHA GHM Administrators can create Alarm Causes and Resolutions for Assets. Alarm Causes and Resolutions help users document issues that caused temperature alarms and document the solutions.
Step by Step
Learn how to subscribe or modify your notifications in EHA GHM. Notification can be enabled for shipments and storage monitoring assets that are in contact with a EHA GHM Passport.
Note: Shipment and Storage Monitoring notifications are only supported if the Trek is within range of a EHA GHM Passport.
The EHA GHM Trek Pro is a wireless data logger that monitors temperature, humidity, and light. Its small size and long battery life make it an ideal way to gain visibility into what’s happening to sensitive products in transit and storage.
Features of the Trek Pro include:
Senses temperature, humidity and light
Up to 3 year battery life while monitoring
Smaller than a deck of cards
Durable and water-resistant
PQS pre-qualified by the WHO
A brief overview of how to turn on the Trek Pro for storage and shipment monitoring use cases.
Begin monitoring with the Trek Pro
1. To start monitoring, slide the switch to the right.
2. Place the Trek Pro(s) into the cold storage area.
3. Devices will continuously monitor conditions
4. Log in to the EHA GHM Web Application (app.eha-ghm.org) and create an Asset.
EHA GHM Admins can create “Assets'' within Facilities in the EHA GHM Web App. This allows Admins to repurpose Treks to different areas within their facility, or deploy more, as needed.
Step by Step
1. Log in to the EHA GHM Web Application (app.eha-ghm.org).
2. Select Administration.
3. Select Facilities
4. Select a Facility
5. Select Asset
6. Select Add Asset.
7. Enter the asset name.
8. Select asset type from the drop-down list.
9. Enter the make, model, and serial number for refrigerators or freezers.
10. Select the Trek ID from the drop-down list to associate the Trek devices with the asset.
a. Trek Pro device IDs are located near the QR code on the back of the device.
11. Add a description in the location field to describe where the device will
be located within the storage asset.
12. Select the monitoring start date.
13. Select SAVE FACILITY.
Note: When replacing an existing Trek Pro, add an end date to the original device. You can then add the new device with a corresponding start date.
EHA GHM administrators can add or edit Facilities in the EHA GHM Web App. This allows Admins to deploy more storage assets and configure them in the Web App.
Step by Step
1. Log into the EHA GHM Web Application (app.eha-ghm.org).
2. Select Administration
3. Select Facilities
4. Select + ADD
5. Enter a facility name.
a. Add Facility Location (Optional): Select the Locations tab (if not already selected) and enter the full street address of the facility into the search bar. Wait for the address to appear below, and select the address.
6. Select SAVE FACILITY
Note: Facilities can be added at any level in the Hierarchy.
EHA GHM Administrators can associate Facilities to an address where goods are monitored in storage.
Step by Step
EHA GHM Mobile Users can acknowledge alarm Notifications. This clears the alarm from the Trek Pro, and allows the user to mark the alarm as resolved.
Step by Step
Note: Acknowledging alarms will clear all current alarms and the Trek Pro button will blink green when pressed. No data will be lost.
EHA GHM Users can record Alarm Causes and Resolutions when excursions occur within a given asset. This feature can serve as a log and a historical record, documenting the cause of excursions and good practices to resolve them.
Step by Step
Note: Documented alarm causes and actions will be saved to the Activity Feed and available for review on both the web and mobile apps.
Feature Available on Android.
EHA GHM Mobile Users can view min and max temperature recordings on their mobile device for the last 7 full days (midnight to midnight), beginning with yesterday. Any Treks assigned to the asset in the 7-day period will be visible.
To display min/max, Trek data must have been previously transferred to the web app. To keep this data current, transfer Trek data daily.
Step by Step
Max = Maximum temperature of any Trek assigned to that asset for the specified day.
Min = Minimum temperature of any Trek assigned to that asset for the specified day.
The data is refreshed about every 12 hours, assuming the device has internet connectivity. The time zone displayed matches the time zone on your mobile device, not your web settings.
Make sure you are connected to the internet. Try uploading data with the mobile device. If something goes wrong, a notification will appear letting you know the transfer was not successful.
Yes, historical data for more than 7 days can be viewed, but only on the web portal. At this time, the mobile app can only display up to 7 days of data, but if you require additional lead times, please contact your EHA GHM representative and let them know.